
Have you already decided to increase the effectiveness of your mass outreach through automation? Then you’ve probably downloaded Linked Helper and are looking forward to creating your first LinkedIn campaign. Even if you are an experienced user of the software, you may encounter errors or difficulties.
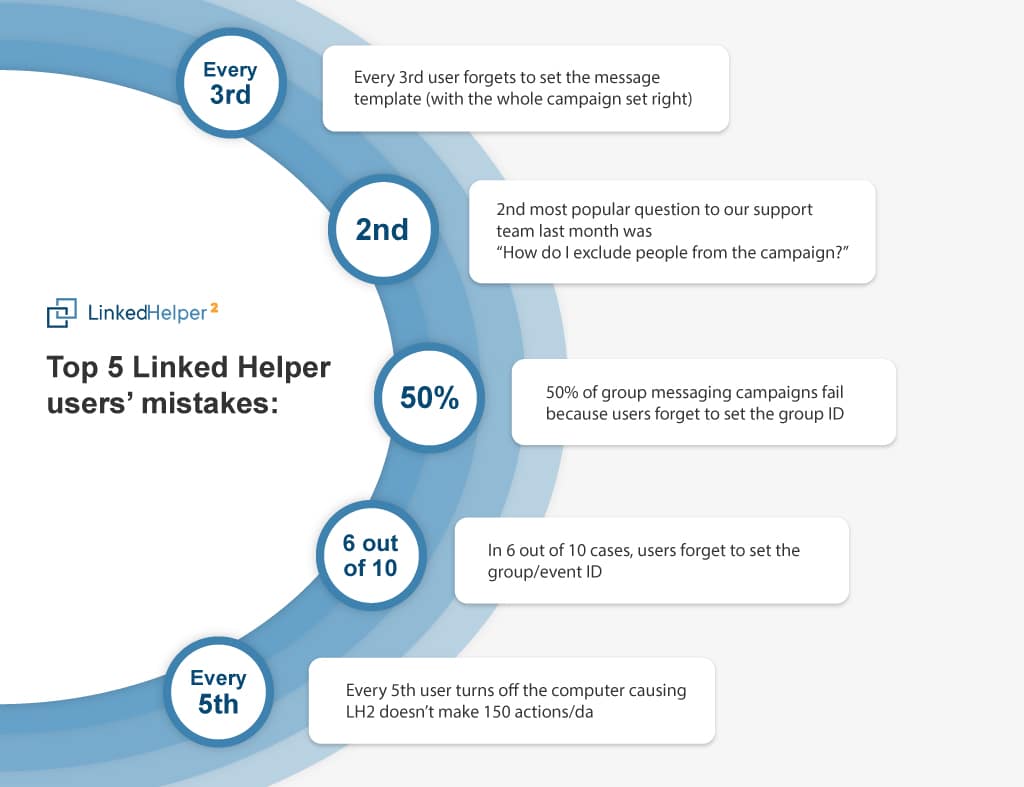
Therefore, in this article, we have collected the top 12 questions (and answers!) from our customer support team that will accelerate easy growth. Study each question and answer before you start a campaign. By becoming an expert at Linked Helper, you can avoid the weekly invite limit on LinkedIn and reach hundreds and even thousands of leads without manual clicks. This marketing scenario is safe and ideal for social selling in 2023.
Download Linked Helper 2
and get 14-day free trial right now
DOWNLOADIf you are not yet in our list of users, then join.
We give you a trial version to start your experience with our LinkedIn tool.
#1 Is my workflow configured right?
In Linked Helper you will find many templates in the campaign generator. If you want to go error-proof, we encourage you to use ready-made campaign templates for typical workflows. Use ready-made action sequences for typical situations. For example: Invite and follow-up, Messaging sequence, Warm-up, invite, and follow-up.
If you created a campaign from scratch – starting from an Empty campaign – or added steps manually, then you need to make sure that you have done it correctly. Action steps are performed top to bottom. So, for example, the “Message to 1st connections” action must not be placed above “Invite 2nd and 3rd.” Users outside your network will not be able to receive a message for 1st degree connections. First, you need to invite those who are 2nd or 3rd degree connections to become 1st degree connections. After they accept the invite and the filter checks that they have become your contacts, the software will send a message.
But you can also send bulk free InMails to these users, even if they’re not on your network via Linked Helper.
Read more about the Workflow.
#2 Do I know where and how to collect leads?
Linked Helper can collect profiles from 7 different pages on a basic LinkedIn account alone, plus Sales Navigator search and lists, and the Recruiter platform. different sources. You can select a filtered search page from any LinkedIn plan, everyone in your network, those who interact with your content, and many more. Read the full list of sources in our article. Explore tutorial on how to collect profiles.
With such a variety of sources, it is easy to land on a wrong page for collecting to your campaign. Take a look at this example!
❌ Error example:
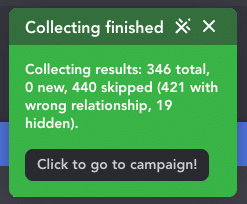
In the screenshot we see an error message that says 440 profiles were skipped while collecting. That’s a lot! Why did it happen? The user was trying to collect profiles to invite via Linked Helper, but he went to My network page where his current 1-st level contacts are shown. In this case the software could not collect profiles in the Queue for the action “Invite 2nd and 3rd level contacts” from the people I chose from “My network.” That’s because people in this audience are already my 1st degree contacts, so I can’t send them an invite.
Now that you are on the right page, consider better targeting your audience.
The better the leads to be added to the Queue are filtered, the better the results – because you will not waste software time and actions on irrelevant profiles.
Here are some tips to help you better segment your audience:
- Use LinkedIn’s built-in Boolean filters (read out blog post LinkedIn boolean search: Detect qualified leads & scrape the database).
- Break the profile selection into smaller groups. For example, you can first collect leads for a specific job title or location on LinkedIn. If you are faced with the task of adding all Sales Managers in Germany to your network, you can first collect people from Berlin, then select Frankfurt, and so on so that only relevant leads are in the search results. Read how to add more than 1,000 contacts to the campaign.
- Try using Sales Navigator to collect profiles. You can start with a free trial. There are more filters in this solution and it is possible to exclude profiles by using it.
However, our robot is smart, and if the campaign starts with an action that requires a certain level of connection (i.e. invites or messages to 1st-first degree contacts) then unqualified profiles will be skipped. But if you chose “like” as the first action, then no profiles will be excluded (because you can put likes on everyone).
To put it in a nutshell: profiles of your 1st degree connections cannot be put into the Queue of an action designed for processing 2nd and 3rd degree connections. This explains why you may have skipped profiles if you tried to “Invite person to event” who are not your 1st degree connections.
✅ How to add profiles to the Queue correctly:
Create a campaign and add action.
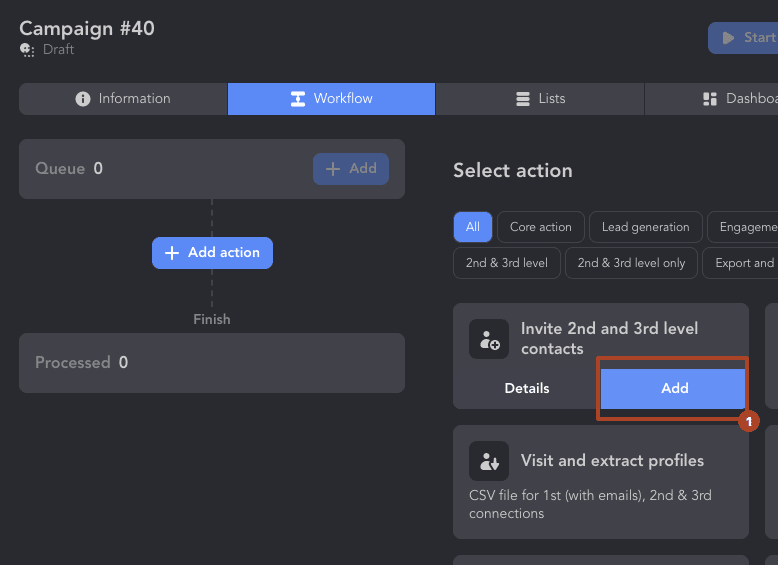
Choose Queue → +Add.

Choose one suitable source. For example: Search page.
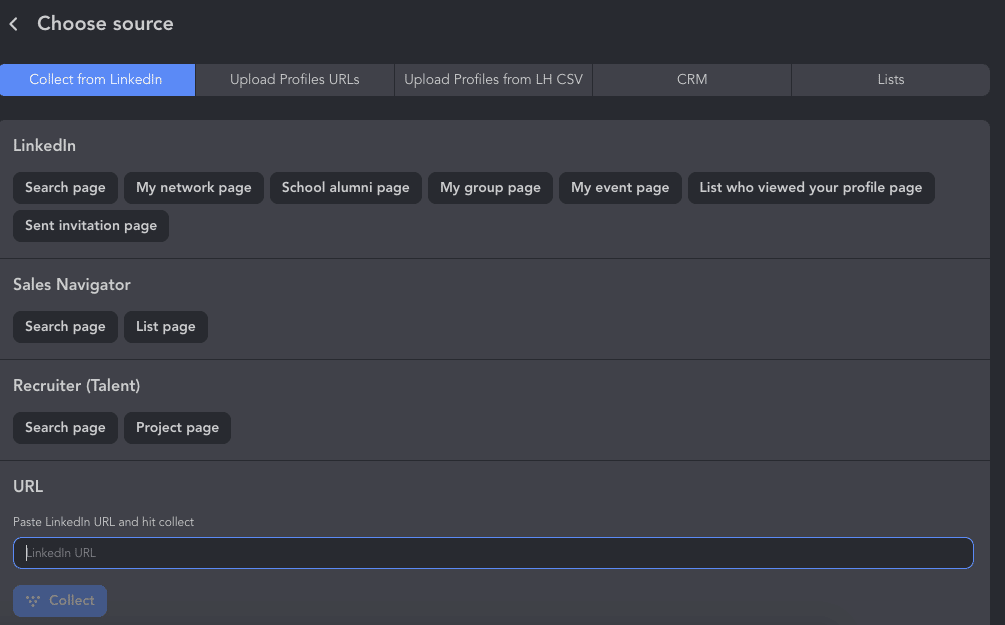
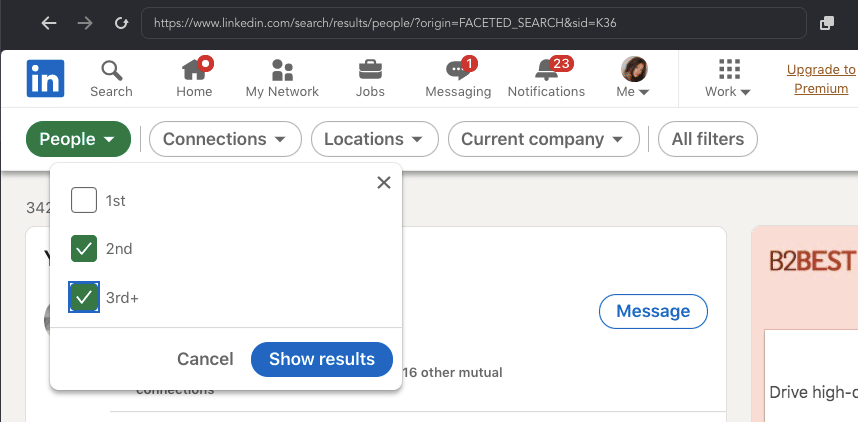
Set filters for the target segment. For example, you can pick LinkedIn 2nd and 3rd+ level connections.
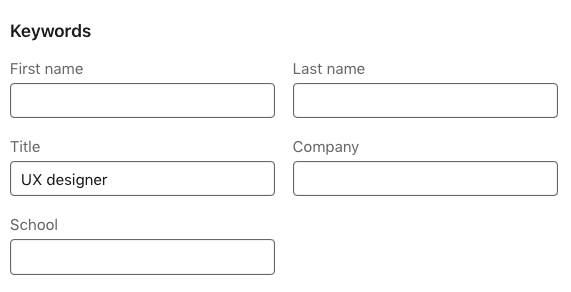
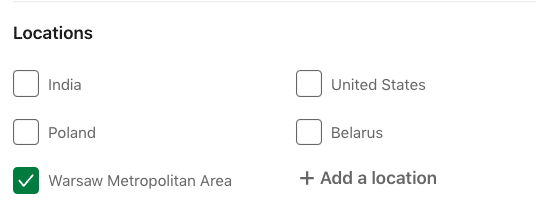
Set the desired title and location.
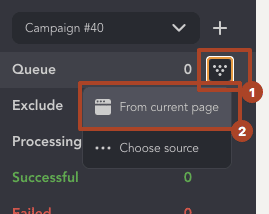
Click on the funnel icon → From current page.
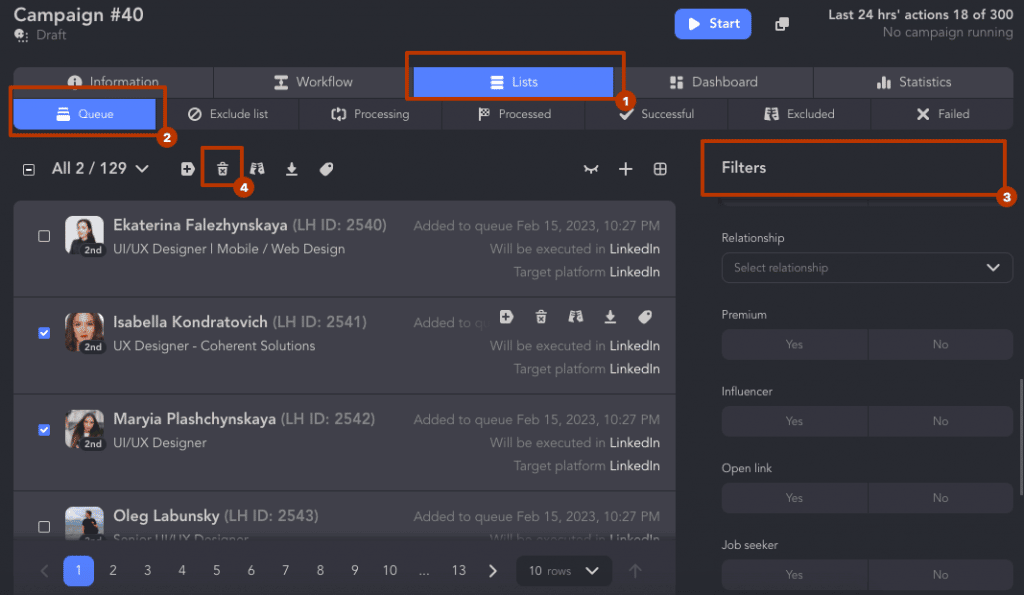
After collecting profiles from the search page, you can remove unnecessary ones in the Queue. Go to Lists → Queue → select filters to search for people → click on the trash can icon.
#3 Do I want to receive replies to my Sales Navigator Inbox, LinkedIn messaging inbox, or both?
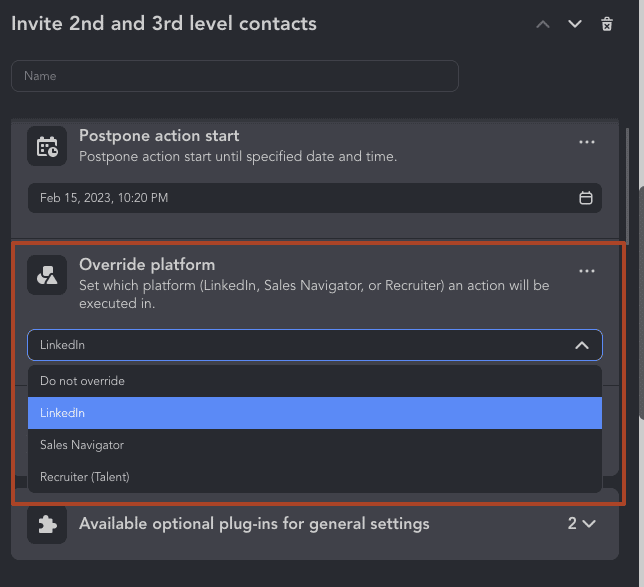
If you prefer to gather all replies to your regular LinkedIn account, set that platform as your processing platform by using the Override feature. For example, you can collect contacts using Sales Navigator for better filtering but send invites and get messages with a regular LinkedIn inbox. By default, Linked Helper sends messages from the platform where the leads are collected. Plus, after your Sales Navigator subscription expires, you lose access to your Sales Navigator inbox and message history.
To enable the Override feature, you need to install the free plugin in our Plugin Store.
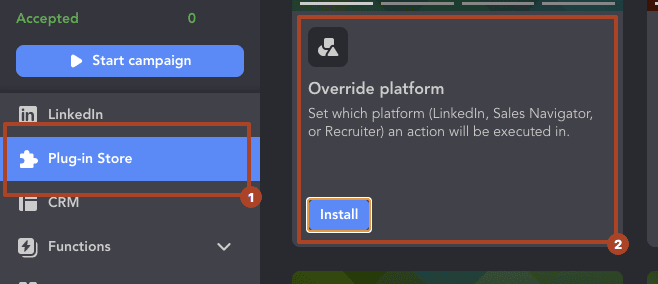
After adding the plugin, you can choose which solution you want the tool to use for collecting replies and sending invites.
#4 Have I forgotten to set my message templates?
Check your Workflow for actions that involve sending a message (Message to 1st, Invite, Inmail, Message to event attendees). If you leave your message template empty, you will end up with a failed action saying “message template is empty.”
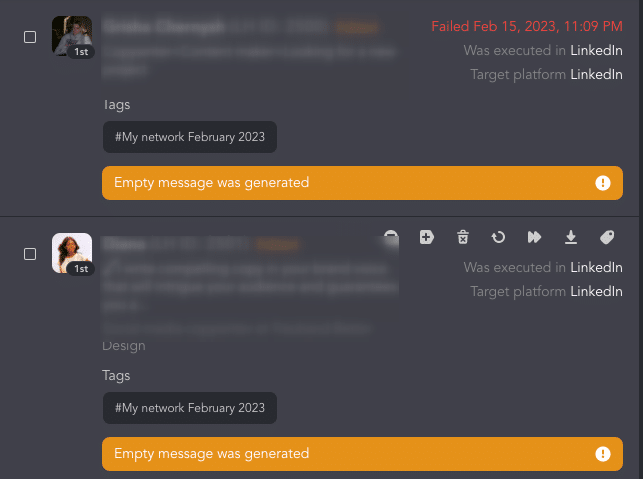
Linked Helper is smart. After failing four profiles in a row for the same reason, it will put that action to sleep. But you will not receive any alert. It’s a shame to waste several hours or days for such a silly reason. So make sure to check your message templates!
You can set LinkedIn message templates in the action setup where it is possible to send a message. Use the Message template editor to paste your text.
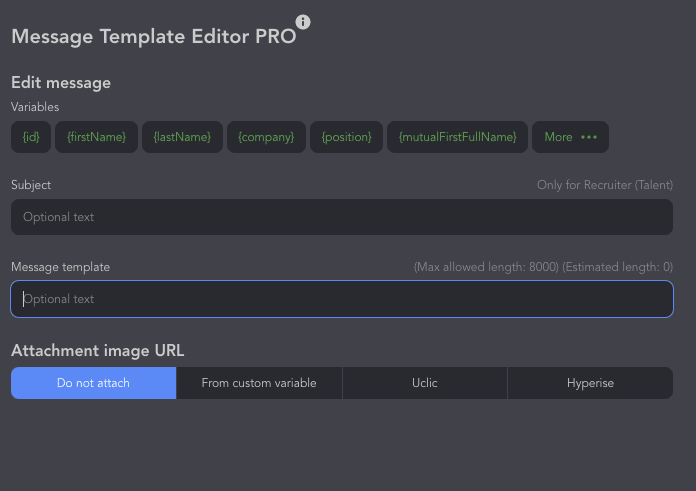
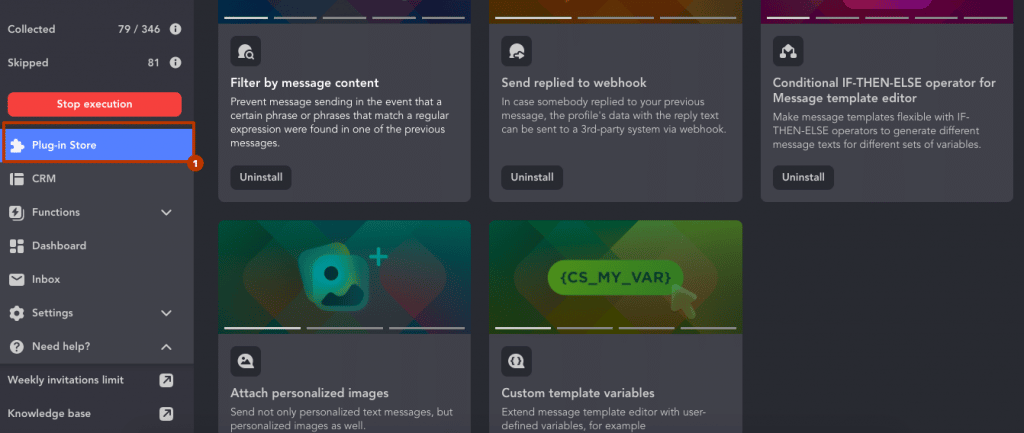
In the free Plugin Store, you can add advanced options for creating message texts. For example, use custom variables and IF-THEN-ELSE operators (read more in the article IF-THEN-ELSE explained: create custom messages in Linked Helper ), use integrations to send preview links or personalized images (explore our tutorial Uclic & LinkedIn automation tool: Deep personalization tutorial 2022), or send responders directly to your CRM via a webhook (learn how to use webhooks).
You may find your perfect sample for LinkedIn message templates in our blog LinkedIn cold message template: 11 examples for 3X response rate
#5 Have I set a fallback/alternative message?
Especially if you are using custom variables, or the integrated LinkedIn variables {mutual_first} or {company}, it may happen that LinkedIn is not showing data for this variable.
In that case, the software will show you an error for the {company} variable: “No company is shown in this profile workplace section.” Even worse, if you choose the variable {mutual_first} for the number of mutual connections but you don’t have any, the robot will use 0 in the message (which will look really weird). So it’s vital to know how to add composite templates and include a fallback message using IF-THEN-ELSE operators (watch our video tutorial).
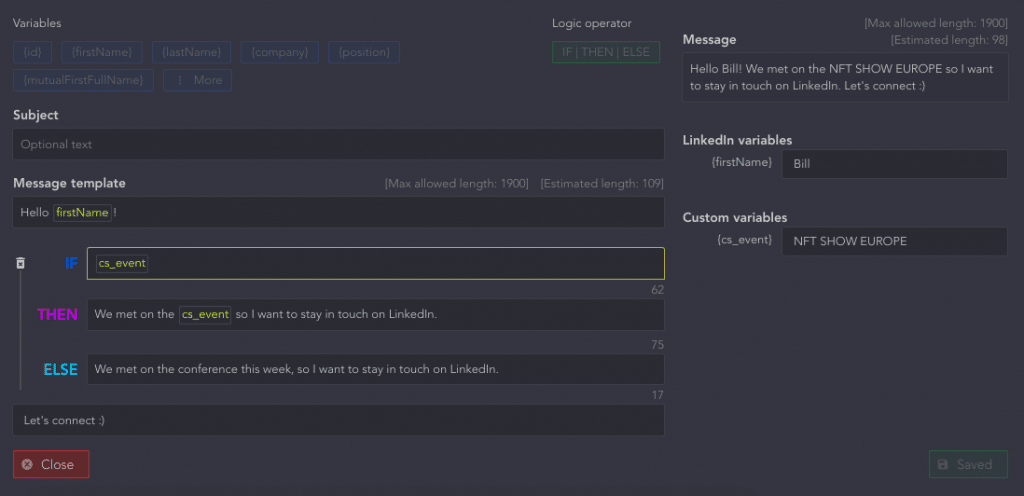
It’s possible to improve your LinkedIn InMails, invite messages, and all other texts with variables.
Note: To use variables and IF-THEN-ELSE operators, add this setting to the Plugin Store.
#6 Have I set Group ID, Event ID or webhook URL in my actions?
Some actions require setting a group ID page for profiles. When you choose to send messages to fellow group members you are not directly connected with, the ID is crucial. It tells Linked Helper what page to use to send a message from.
Note: If collecting directly from a group/event, LH2 will automatically scrape the ID and nothing needs to be done. However, if collecting filtered leads from a Sales Navigator search by group or uploading event attendees from a text file, the IDs will not be collected automatically and will need to be manually set.
Check that you have set the ID for:
- LinkedIn Message to group members
If you want to text everyone who is in the same group (event) as you within your campaign, you need to enter the ID in the campaign settings. To do this, you need to open the Queue, select the necessary (or all) leads and click on the icon Change platform to configure the group ID (shown in the screenshot below).
Note: To be able to Change platforms you need to install the free plugin “Override platform.”
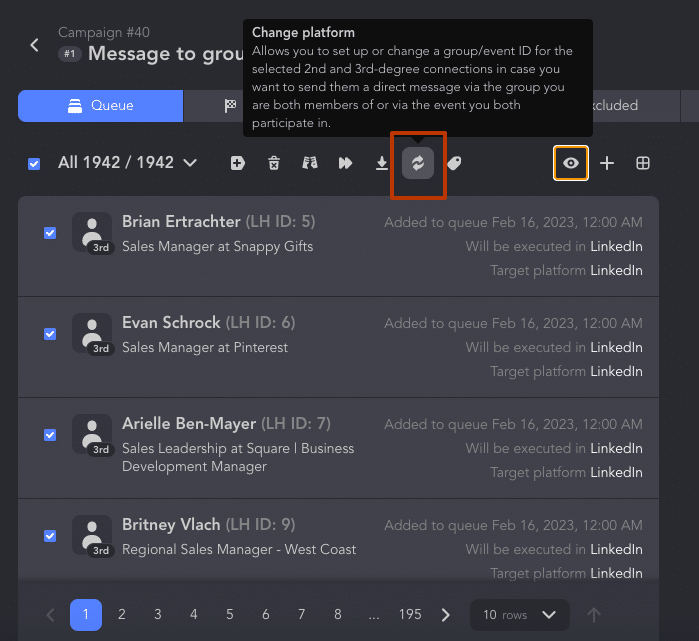
Next in the menu, you need to enter the event or group ID in the field “Collect scope ID.”
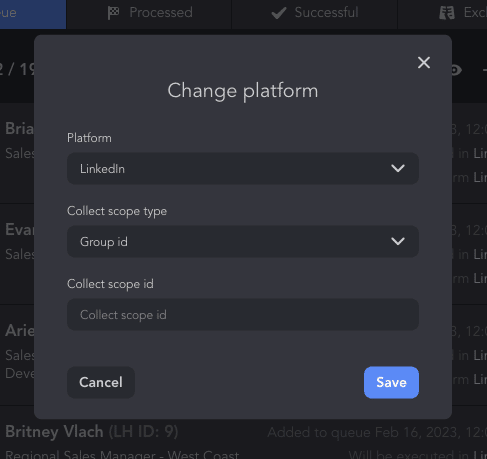
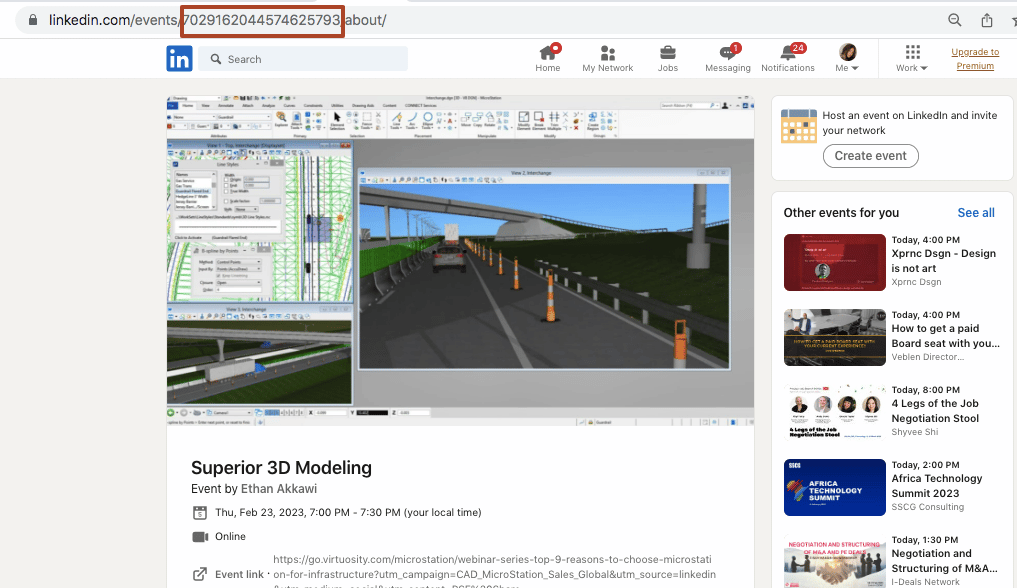
Where can you get this data? Open the link of the event or group you want to use for bulk messages. In the address bar you will see numbers after the word groups/events – these are the numbers you need to copy. For example:
You can explore How to change LinkedIn platform for processing profiles in the manual. Learn How to filter profiles via Sales Navigator and message them for free as LinkedIn group members?
- LinkedIn Message to event attendees
For this action, you also sometimes need to use the event ID. You can learn in detail how to deliver a LinkedIn message after a networking event to all participants, even if they are not in your network.
- Send person to webhook
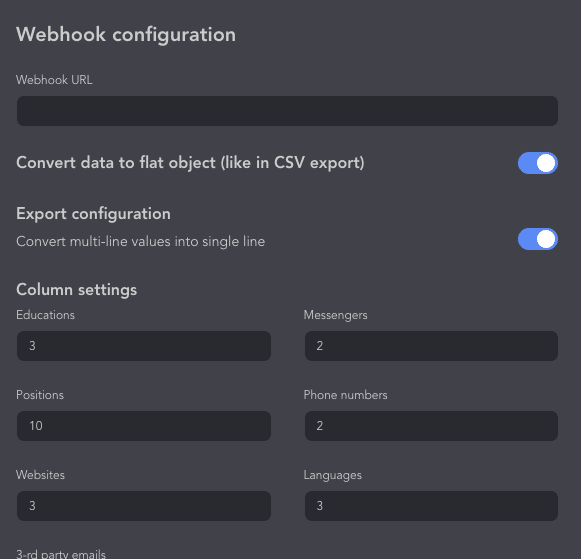
You can install this plugin which will help you send lead data directly to a CRM or third-party app. For example you may try LinkedIn Sales Navigator for lead generation and use the webhook integration to deliver the data to your sales team. However, it is important to remember to paste the webhook URL and save the settings.
#7 Have I excluded unwanted profiles?
Ask yourself if you might have sent similar messages to these people before. Did you perhaps use another Linked Helper campaign targeting these people? You can compare two campaigns using List Manager and ensure that in your newly designed campaign you are not including the same folks.
Open the Plugin Store and install the “Lists manager” plugin.
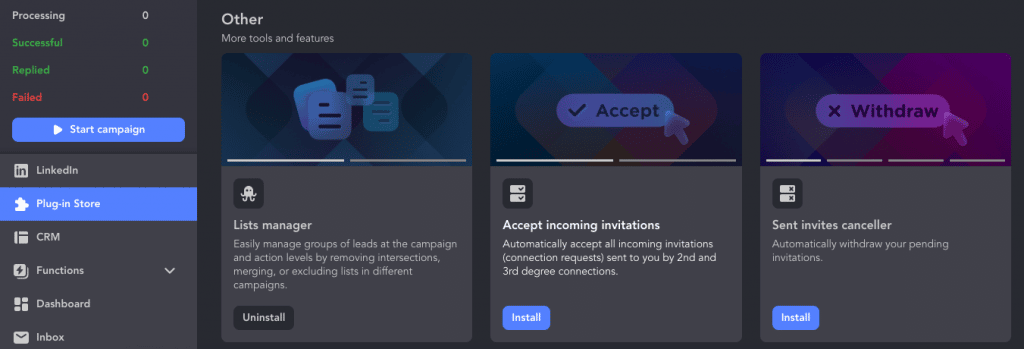
Open Functions → List manager.
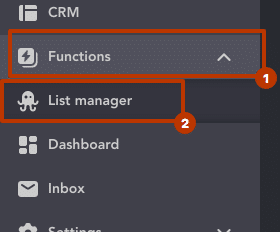
Delete the same contacts from two campaigns. You can check our video tutorial for guided instructions.
Select two campaigns for which you want to make sure that you won’t reach out to identical leads. In the Target campaign, you can remove duplicate leads from the Source campaign. Select the Queue rows of the two campaigns. Click on “Delete the same.”
If you want to remove duplicates both in the target campaign and in the source, select Remove intersection between campaigns in the menu.

As a result, you will see a notification that the same profiles have been removed from your new campaign.
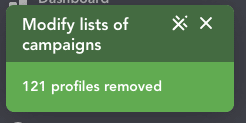
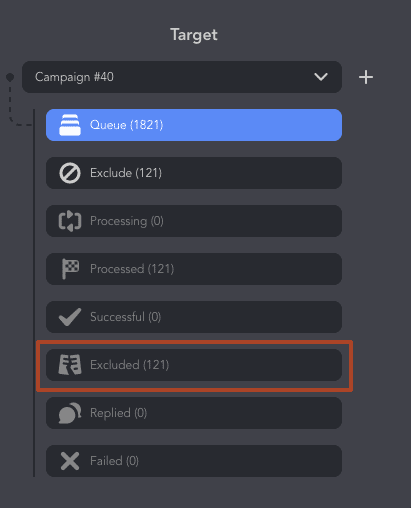
These profiles will be placed in the Excluded section of this campaign, which means that the software will not perform the assigned actions with these profiles. Thus your LinkedIn campaign targeting is extremely specific and relevant with Linked Helper.
#8 Are other campaigns scheduled in parallel?
Linked Helper allows you to schedule and run multiple campaigns. By default, this feature is disabled. But you can activate the “Multi-campaign runner” plugin by opening the Plugin Store in the software.
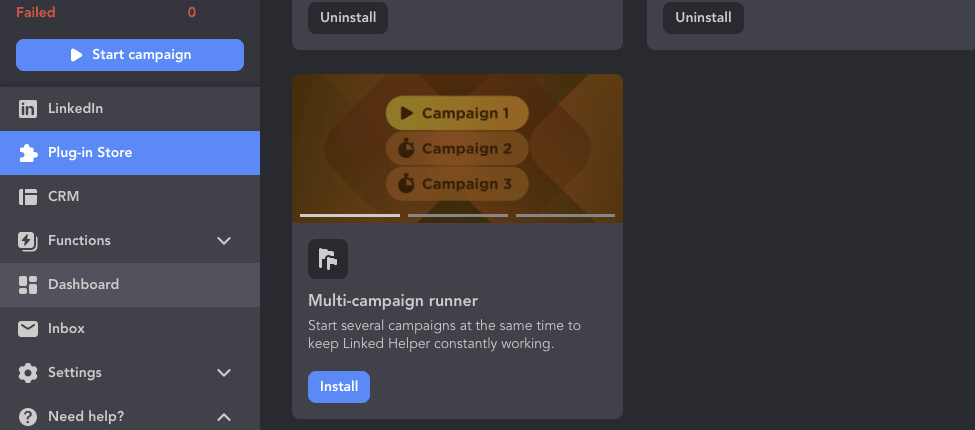
View our detailed YouTube video to dive deeper into this feature.
While one campaign is being run, others are waiting in line. If you have other campaigns in the Queued status, your current campaign might not be the one to start immediately (when you hit the Start button). Linked Helper prioritizes earlier campaigns. If you want to focus on one current campaign only, make sure others are put on Stop.
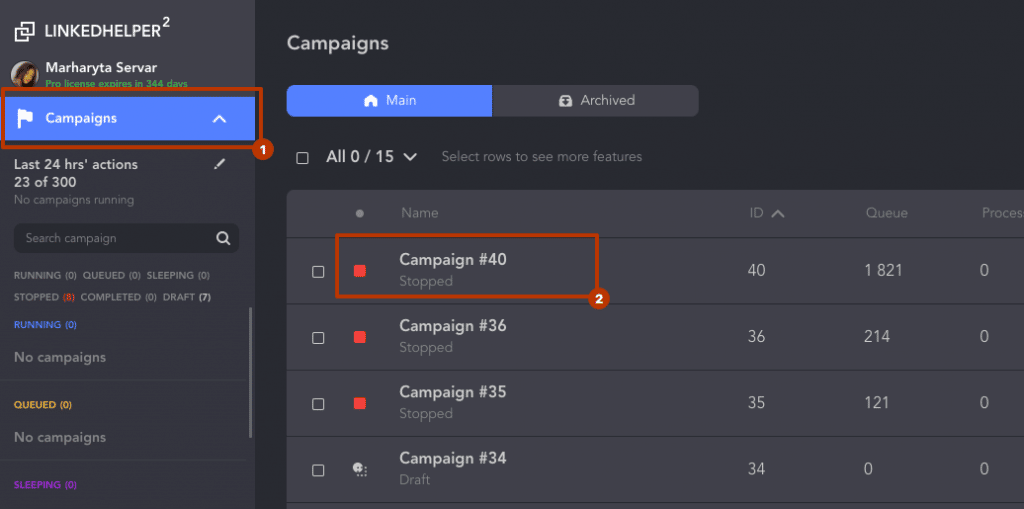
To manage multiple campaigns, open the Campaigns section → select the desired campaign to start and stop the rest.
# 9 When do I want my messages to be sent?
Linked Helper starts to process campaigns immediately, unless you postpone them, if there are no time-outs or limits in the way. Processing times are aligned with your OS clock. If you are targeting someone who lives in Brazil while you are living in Australia, use Postpone start, Working Hours to adjust your processing times. Different time zones can be crucial for a worldwide outreach campaign.
Postpone action start
In order for the Postpone action to start working you need to open the Plugin Store and select the plugin of the same name. After that, you can manually set the start time for all campaign actions.

Open the desired campaign action. You will see this setting with a calendar icon where you can set the date and time for launching the action. Consider the time zone of your target audience to achieve the best effect.
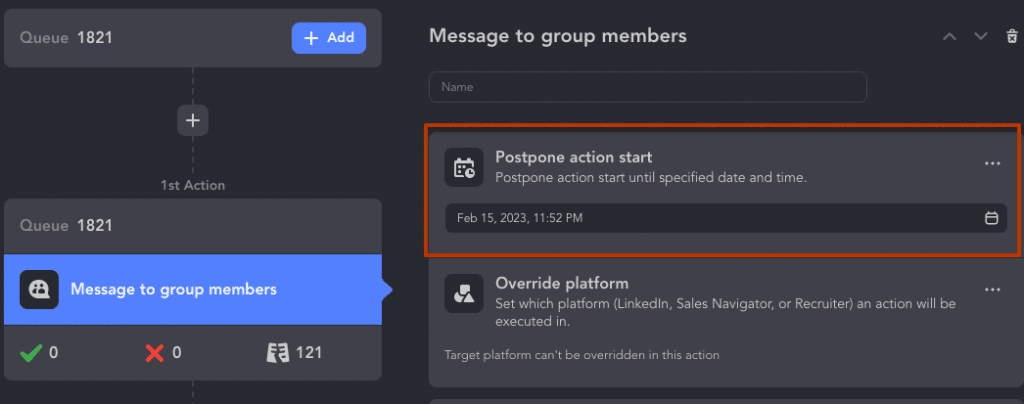
Read detailed instructions and use cases in our manual. For example, you can postpone the action to send bulk messages to all leads in the Queue until the software sends invites to each of them.
Note:
- This feature is not intended to create long pauses between actions, such as waiting for 2 days between follow-ups. For such cases, the Delay action should be used. The Postpone action only delays the start of the action execution. For instance, if the first message was sent before an event (scheduled for March 13 and today is March 12), Linked Helper should start sending the second follow-up a couple of days after the event, i.e., on March 15. In this case, a one-time delay is appropriate.
- To set a pause between actions, use the Delay action or specify it in the Checker in the Move profile to a successful list setting.

Working Hours
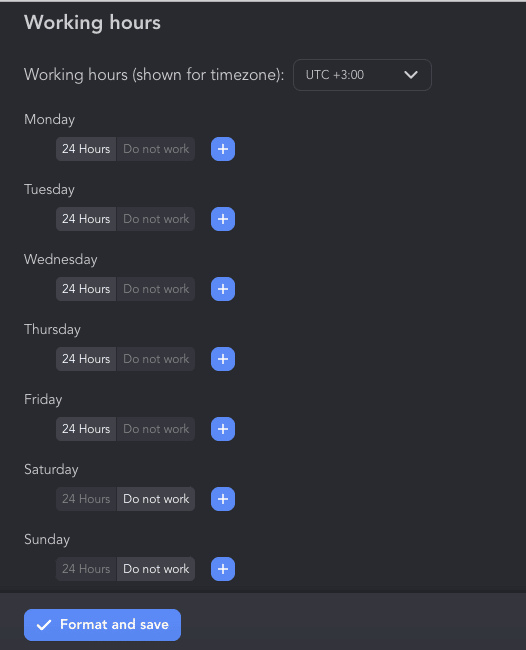
You can set the hours for campaigns to run. Also in this section you can set the time zone.
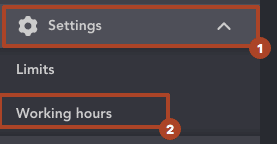
Open Settings → Working hours. You can choose the time frame for the software to work or, for example, exclude work on weekends. It can also be useful if you install Linked Helper on a remote desktop (so that campaigns run even when the software is in sleep mode). Therefore, it is important to pre-set time intervals that are relevant for the activity of your audience.
#10 Do I want to send follow-ups to everyone or just to those who respond?
In an outreach campaign, you need to perform actions in logical stages. The software is configured for gradual and step-by-step communication where you can also set custom delays between actions.
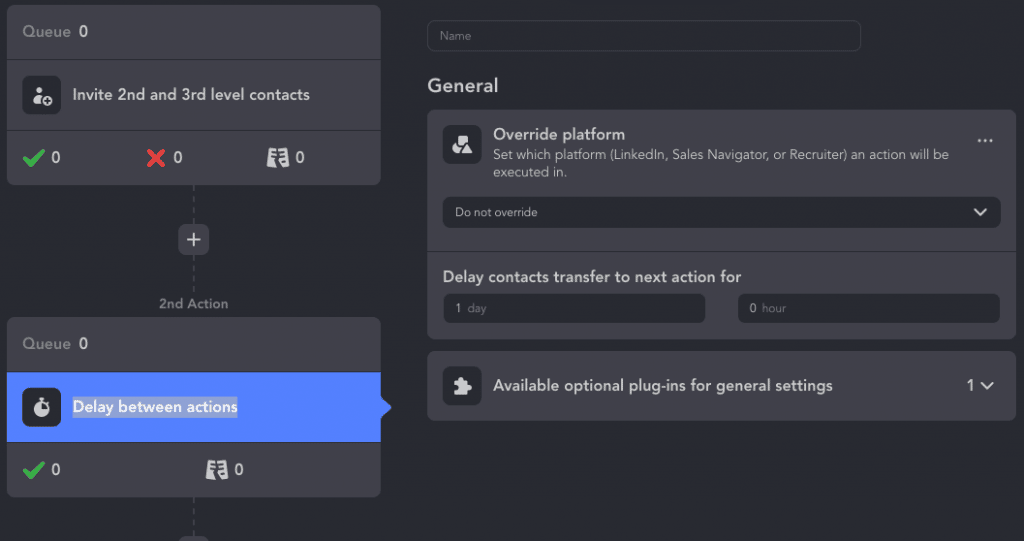
For example, after sending an invite and before the first message, it’s important to take a break. This will help you not act like an intrusive LinkedIn seller (or recruiter) and will also give leads time to study your profile and react to the Invite message.
You can add a delay between actions after the auto-invite action. In the settings, you can set the period after which the software should proceed to the next action (for example, send messages to your first degree connections).
In the settings of the second action of the campaign (for example, mass messages to 1st degree contacts after the invite messages), you will find the “Message analyzer” section.
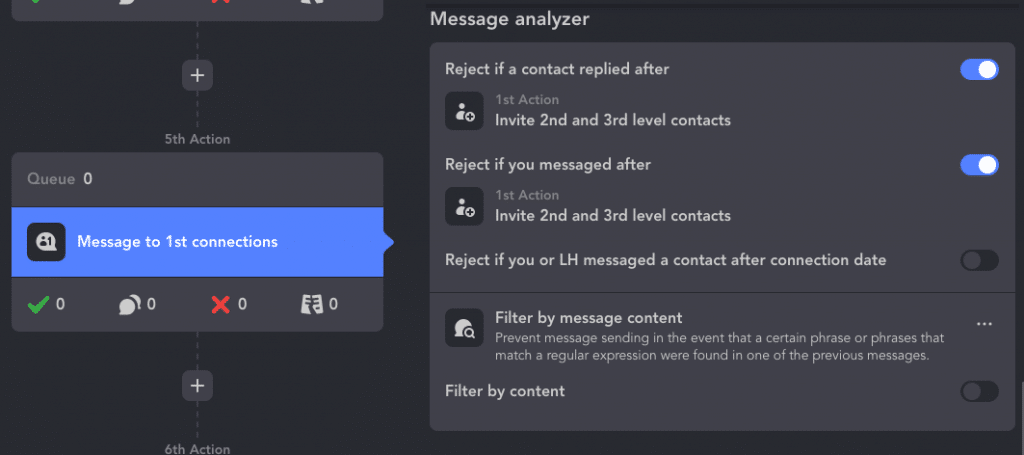
These settings will help to exclude from the messages those who have already answered you within the campaign or those you yourself have already written to. This is convenient because, for example, you could have already written to a person manually and then forgot. But by enabling this setting you will eliminate the chance of re-sending an auto message (which may already be irrelevant).
Read more about how these functions work in the manual.
If your campaign consists of a chain of messages, then the LinkedIn follow-up message will reach only those who did not respond to the previous message! But you will see everyone who replied to you in the Replied section, so you can re-add them to a new campaign. That is, it will give you the opportunity to invite them to follow your company page, or endorse their skills, etc. (but as part of a new campaign, like retargeting).
If you want to create a campaign to send follow-ups to everyone who has already replied, they must be selected at the end of the campaign. Go to Lists → Replied → All → Add to.
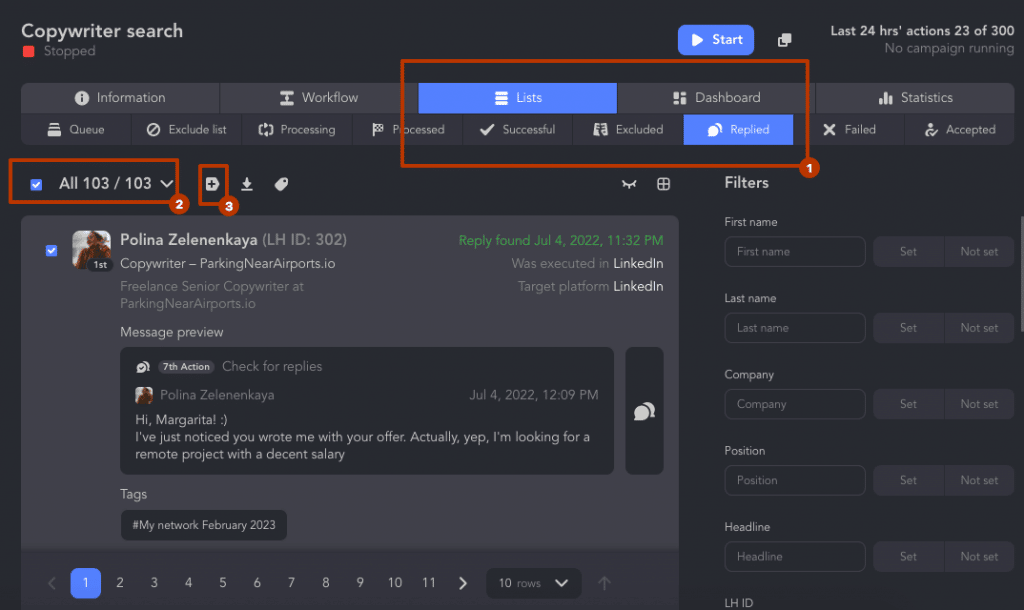
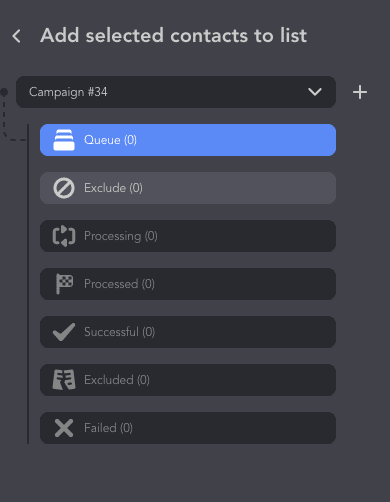
Choose an existing campaign or create one to keep in touch with everyone who has already replied to your messages.
# 11 Have I enabled the LinkedIn invite limit bypass? Do I need to invite more than 100 per week?
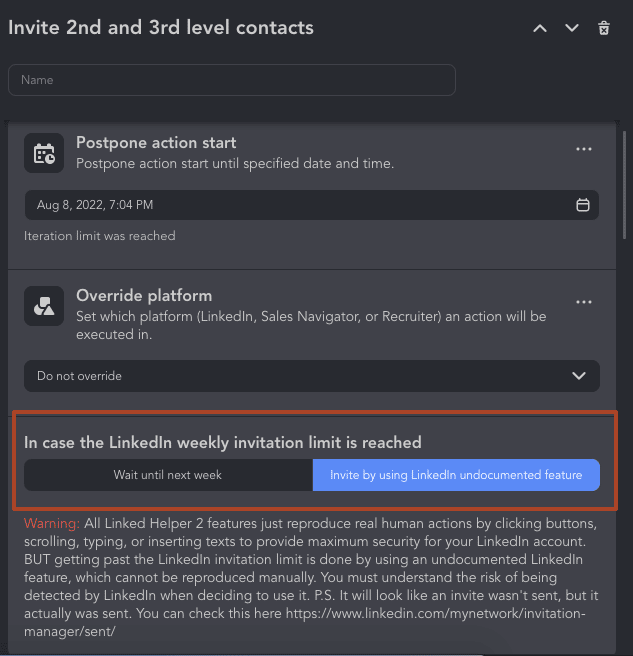
LinkedIn sets invite limits for users that may slow down the development of your network. This helps to curtail spam and overactive sellers. But you may want to be able to grow faster than 100 people per week in your network. There is also a problem with sending bulk invites. After the update in 2022, LinkedIn only allows invites through the contact list of your email provider and no more than 500 leads at a time. Other automation services (except Linked Helper) have lost the ability to bypass the limit due to the introduction of this feature.
If you want to bypass the limit in Linked Helper there is a unique setting in the action for auto-invite. You can enable invites via an undocumented feature in the settings (if you want to keep inviting when you reach 100 invites per week). It will cost you $8.25-$15 / month on Linked Helper Standart or $24.75-$45 / month via a Pro license.
By default, the limit for this action is 50 invites per day. This value for auto-invites is optimal if you are still performing other actions in your campaign. Since excessive daily activity on the social network can draw suspicion from the algorithm and you will receive a warning. We advise you not to go beyond 50-80 invites, but you can manually set the limit for this action. In the Limits section, you can choose the desired numbers for each action and for the overall activity. By default, Linked Helper sets a counter for 150 actions per 24 hours, so if you spend about half of it on invites (50-80) this may be the optimal safe activity.
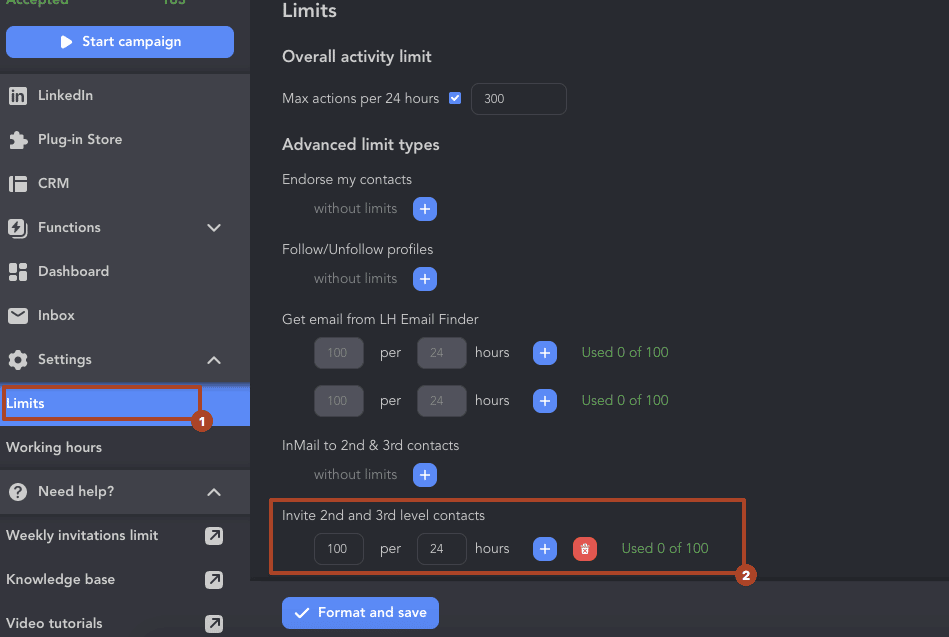
You can look up the recommended limits for an account older than one year in our manual.
We have also prepared alternative ways to communicate with the audience even after reaching the limit.
#12 Should I turn off my computer?
It looks like your campaign is set up perfectly! The remaining issue is small – to understand whether you want to forget about turning on your computer every time you want Linked Helper to work. Linked Helper is not a clod tool. It works locally on a PC.The fact is that Linked Helper works based on smart browser technology. Your activity is distributed gradually over time (like a human user), not happening all at once (which would reveal automation). Therefore, you need to launch Linked Helper in the morning and keep it open with running campaigns until the evening. It’s like a real human assistant that comes to a workplace. But it can also work as a remote employee (read below).
Sometimes you may encounter an error and find your campaign unexpectedly stopped. For example, if you close your computer for a week, the campaigns will not be active. Or if the software worked overnight and already used 150 out of 150 actions allocated for today. Today you turned it on only during the day, when the limits had not yet been renewed, but at night you forgot to activate it (when new daily actions arrived). As a result, for this day there will be 0 processed profiles. Avoid this awful mistake!
Check that the computer is on from morning to evening. Or to make things easier, you can install Linked Helper on a remote server through integration with Host Zealot. This will allow you to run campaigns in the computer sleep mode, work through multiple profiles, and much more. How to install Linked Helper on a VPS.